In previous article "Oracle DBCS : Create Virtual Image Database Deployment - Part 1" we have learned how to Create Virtual Image Database Deployment using Create Service Wizard.
https://netsoftmate.blogspot.in/2018/02/oracle-dbcs-create-virtual-image-database-deployment.html
In this article we will Scale Up Storage Using Oracle Database Cloud Service and Create one storage volume for the Oracle Database software and one storage volume for all database files, and prepare them for use. This will be the part 2 and continuation of the previous article.
Prerequisites
Create Virtual Image Database Deployment
Steps to Scale up Storage using Oracle Database Cloud Service Console in Virtual Image Database Deployment.


Conclusion
In this article we have learned how to Scale Up Storage using Oracle Database Cloud Service console and create storage volumes for Oracle Database Software and Database files.
https://netsoftmate.blogspot.in/2018/02/oracle-dbcs-create-virtual-image-database-deployment.html
In this article we will Scale Up Storage Using Oracle Database Cloud Service and Create one storage volume for the Oracle Database software and one storage volume for all database files, and prepare them for use. This will be the part 2 and continuation of the previous article.
Prerequisites
Create Virtual Image Database Deployment
Steps to Scale up Storage using Oracle Database Cloud Service Console in Virtual Image Database Deployment.
- Open a web browser and enter the URL you received in the Welcome email to login to Oracle Cloud Account
- Enter your username and password

- On the home page, Click "Menu" under "Database" Cloud Service as shown below

- Click "Open Service Console"

- Currently the Storage is 32GB. Let's Scale Up the Storage. Click on the Instance Name

- Click on the "Menu" icon and Select "Scale Up/Down"

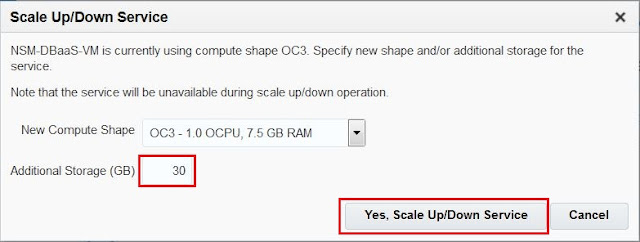
- I am adding addition 30GB storage. Click "Yes, Scale Up/Down Service"Here I am adding addition 30GB storage. Click "Yes, Scale Up/Down Service"

- A message printed on the screen "Service scale up/down request is accepted". The Instance status changed to "Service Maintenance"

- After sometime we can see that the Storage is now Scale up to 62GB. Click on Instance to add more Storage

- Click on the "Menu" icon and Select "Scale Up/Down"

- This time I am adding addition 50GB storage. Click "Yes, Scale Up/Down Service"

- A message printed on the screen "Service scale up/down request is accepted". The Instance status changed to "Service Maintenance"

- After sometime we can see that the Storage is now Scale up to 112GB.

- Get the IP address of the Compute node you want to connect from Oracle Database Cloud Service Console. Here my Deployment Service Name is "NSM-DBaaS-VM" and the IP address is 144.21.72.128

- On the left pane, expand "SSH" and select "Auth". On the right pane, click on "Browse" button. Select the Private Key that matches the Public Key for your Deployment. Click "Open"

- Enter login as "opc" user. You will be connected without prompting for the password. Switch to the "root" user

- Display the list of block devices, the two volumes created are xvdc and xvdd

- First format the volume for the Oracle Database software and mount it as /u01 as shown below


- Now format the volume for the database files, and mount it as /u02 as shown below


- Verify the mount points and display the block devices

- Update the /etc/fstab file so new mount points get mounted automatically whenever the VM is rebooted


Conclusion
In this article we have learned how to Scale Up Storage using Oracle Database Cloud Service console and create storage volumes for Oracle Database Software and Database files.


I would like to thank you for the efforts you have made in writing this article. I am hoping the same best work from you in the future as well.
ReplyDeleteOracle Fusion HCM Online Training